Quiet… Tone… Cameras… Action!
Having developed for a governmental project for a while we reached a point, where we had to use one of their services available only on their intranet. Stacks of forms were to be filled to get access.
Sometime ago I’ve been working for a different company but the same customer. We opened a tunnel via telnet connection and that was it, extra servers available, according to your credentials. Yay!
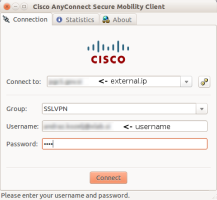
Nowadays the external access is handled via Cisco AnyConnect software and SecureID tokens. Start the GUI app, enter the PIN and the one-time password and off you go!
Which is all fine and dandy to access the extra servers and services. But local connection gets completely screwed up. Mail stops working. No more googling around. Hell, my app does not work anymore since the database is not local but on a server in the local network.
Culprit
AnyConnect sets the default routing through the tunnel and does not let you change that in any way. No exceptions, all traffic is directed through the VPN. Not funny.
Cue OpenConnect, a SSL VPN client which supports AnyConnect protocols and gives you extra freedom that you need as a developer.
Download the package and follow these instructions to build and install it. Pay attention to vpnc-script part and the –prefix part while configuring the build process, to put the package where it belongs.
Once downloaded and upacked, follow these steps:
openconnect$ ./configure --prefix=/usr/bin/
openconnect$ ./make
openconnect$ sudo ./make install
There you go, OpenConnect ready!
Setup… take 1
My advice is, read this part through but do not act… yet. Hint: I did not manage to make it work.
But get the script ready and get the binaries. Read more below… and start acting at the “take II” part.
My Ubuntu 14.04 machine has connections managed via NetworkManager and first thing I did was to install network-manager-openconnect plugin:
$ sudo apt-get install network-manager-openconnect
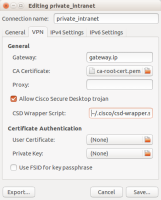
Open up NetworkManager, click “VPN Connections” and choose “Configure VPN…”. Select “Add” and choose “Cisco AnyConnect compatible VPN (openconnect)”. Dialog on the right is displayed.
- Gateway: is the address you can see in the AnyConnect dialog too. It represents the intranet entry point. Enter the IP address or the server name (see AnyConnect dialog image above, “external ip”).
- CA-certificate: connection is established via SSL, which means the server needs to be verified. Certificates validity can only be verified if you can provide the CA root certificate for the gateway server certificate. Download it’s PEM version from the issuer CA agency and make it available.
- Allow Cisco Secure Desktop trojan: this sounds bad and it is. But we’re going to use it to our own purpose. Tick the box!
- CSD Wrapper Script: Have you read the short explanation of what CSD is? Well, what I learned was that Cisco sends a binary to your machine, where it should be started and it gathers some security related parameters. Once it’s done, it posts its findings back to server, which then decides if your machine is secure enough for the connection to be established. And here’s the tricky part. I learned a lot here. The binaries might not execute correctly on your system. Or not execute at all.
This script is not needed. In an ideal world. But try running the connection without it. All I got was this:
POST https://gateway.ip/
Attempting to connect to server <ip_address>:443
SSL negotiation with gateway.ip
Connected to HTTPS on gateway.ip
Disabling XML POST due to authgroup option
GET https://gateway.ip/
Attempting to connect to server <ip_address>:443
SSL negotiation with gateway.ip
Connected to HTTPS on gateway.ip
Got HTTP response: HTTP/1.0 302 Object Moved
GET https://gateway.ip/+webvpn+/index.html
SSL negotiation with gateway.ip
Connected to HTTPS on gateway.ip
GET https://gateway.ip/CACHE/sdesktop/install/binaries/sfinst
GET https://gateway.ip/+CSCOE+/sdesktop/wait.html
Refreshing +CSCOE+/sdesktop/wait.html after 1 second…
GET https://gateway.ip/+CSCOE+/sdesktop/wait.html
SSL negotiation with gateway.ip
Connected to HTTPS on gateway.ip
Refreshing +CSCOE+/sdesktop/wait.html after 1 second…
GET https://gateway.ip/+CSCOE+/sdesktop/wait.html
SSL negotiation with gateway.ip
Connected to HTTPS on gateway.ip
Refreshing +CSCOE+/sdesktop/wait.html after 1 second…
GET https://gateway.ip/+CSCOE+/sdesktop/wait.html
:
:
…and so on, not moving from this point. It seemed that once the CSD was transferred (see bold line above), it never yielded any results back (must admit, I didn’t check the traffic on the wire). But it was frustrating as it was.
So, I needed to execute the CSD manually. Cue CSD Wrapper Script.
CSD Wrapper Script
I prepared the following script, which works just fine:
#!/bin/sh
shift
while [ "$1" ]; do
  case $1 in
    -ticket)    shift; ticket=$1;;
    -stub)      shift; stub=$1;;
    -group)     shift; group=$1;;
    -certhash)  shift; certhash=$1;;
    -url)       shift; url=$1;;
  esac
  shift;
done
args=" -log debug -ticket $ticket -stub $stub -group $group -host $url -certhash $certhash"
exec "$HOME/.cisco/hostscan/bin/cstub" $args
While some scripts process also the “langselen” parameter, I had trouble with parameter shifting (not enough parameter). If you can handle english you’ll be just fine. 🙂
Some of the scripts I’ve encountered were complicated and were managing all kind of edge-cases. If you’re interested (and have time), take a look at this one to get some ideas.
Go go go!
Once I had the things in place, I tried to… wait wait wait! Where do I get the binaries you are referring to in the above script? Namely, cstub? Well, this is one form of the binary CSD file I was referring to.
Actually you need three: cstud, cnotify, cscan. And you find them in ~/.cisco/hostscan/bin/ folder on your computer, because AnyConnect put them there.
If you don’t have them, try to download all three of them from the gateway server.
The address is usually
https://<gateway_ip>/CACHE/sdesktop/hostscan/windows_i386/cstub.exe
Now, depending on your operating system, the “windows” part might be “linux” and if you’re running on 64 bits “i386” might be “x64“. There is no “.exe” part in the link for the linux versions!
Also, if the file does not exist, try appending the “.gz” extension to get the compressed version. Do not forget, if this is the case, you must decompress the file before using it! Also, set the executable permission on the files (chmod a+x <file>).
All set! Or… are we?
What about the authentication? I had a physical SecureID token, but all I found were the stoken oriented tutorials. Where and when do I input my credentials? Hell, let’s get the process started and see where it takes us.
It became apparent that… not far. The script was still stuck on the same part, where the gateway server was waiting… and waiting…
Crap.
Let’s forget about the GUI and do this manually.
Start… take II
All I needed was to start OpenConnect manually instead through NetworkManager dialog. Simple.
Here goes:
$ sudo openconnect
    --cafile ~/.ssh/roots/ca-root-cert.pem
    --user <username>
    --csd-user andraz
    --csd-wrapper ~/.cisco/csd-wrapper.sh
    --authgroup SSLVPN
    --passwd-on-stdin https://<gateway_ip>
What is all that?
- cafile: parameter to tell OpenConnect where to find the CA root cetificate, to be able to verify the gateway server connection. If you do not have it or do not want it, use
--no-cert-check - user: your VPN username
- csd-user: your local user, which has access to CSD wrapper script and will execute it. Do not put a root privileges user there!
- csd-wrapper: path to the CSD script, which will be executed instead of the binary pushed from the gateway server
- authgroup: depending on your configuration, you can set this parameter prior to the connection or, if needed, you can input it once prompted for it
- passwd-on-stdin: trigger a prompt, when authentication is needed
OpenConnect was telling me about an error, but I chose to ignore that completely. HAL functionality was moved and is now deprecated. Error was:
sh: 1: /usr/bin/hal-get-property: not found
sh: 1: drweb: not found
Finally, after 2-3 rounds of waiting for the CSD “scan” I got a password prompt. Fingers crossed!
Login failed.
Please enter your username and password.
Password:
Well, this was the place to enter my SecureID PIN and one-time password. Once done, again, yay! Connected!
All I had to do now was use ip route add... to add a route to my DB server and I could use my application, connect it to the database AND the remote service at the same time.
You can also set a new default routing, to restore local connectivity and take care with extra routes to your external services.
Or you can play further with dnsmasq. But I’ll leave that for another post. 🙂


You may also want try vpn-porthole a Docker based solution to accessing VPNs:
https://github.com/sourcesimian/vpn-porthole/blob/master/PROFILES.md#cisco-hostscan
Pingback: » Uni-Weimar VPN Client unter Linux mit OpenConnect maschinenraum